Love My Cameo Blog Hop sponsored by Chomas Creations
hosted by Amy -Chomas Creations and Sarah -Pink by Design.
If you just arrived from Rebekah's blog you are in the right place, but if you just happened to stop by and wish to hop with us, please start with Amy --HERE
For my first project and using the Chomas adjustable pen holder with my Silhouette Cameo I created this card.
Here is how I created this card/design using the Chomas adjustable pen holder and a Staples gel mini pen in addition to a Silhouette online store cutting file. The file's name is "heart flowers". (yes, any file can be used with the holder and pens/markers, not just sketch files, but cutting files as well).
----------------------------------------------------------------------------------
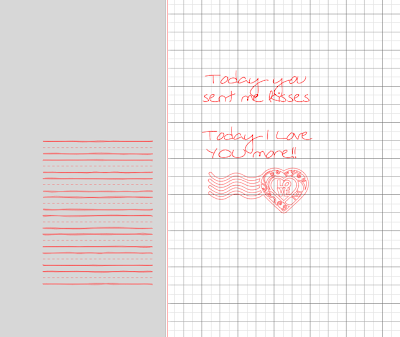
I also created a journal card for my Project Life year long journal/album.
I, first using the Chomas adjustable pen holder with a blue mini gel pen had the Cameo "draw" the paper using the "grade-school sketched paper" file from the online store. I left the paper on the mat and changed to the red gel mini pen and had the Cameo "draw" what you see in red. (Heart file, "three word valentine postmarks" and "AmyLa" font).
After unloading, I trimmed it down to 3" x 4" --ready for my PL album!
Here is a screen shot of the designs on my mat (Design Studio software). After "drawing" the sketched paper file with a blue mini gel pen, I typed and aligned the font or written words. I proceeded to use one of the heart/stamp designs and place it towards the bottom. I finally "removed" or moved to the side the sketched paper design and had my Cameo do its thing with the red mini gel pen and the Chomas adjustable pen holder.
Hope you are not tired! I have one more!
Using a sketch file, I removed some of the layers and continued to oh so easily duplicate the design by clicking on it --object --replicate --duplicate right, left, bottom...etc.
Followed by using the knife! LOVE this thing!
The red line you see is the knife cutting what I don't want (trimmed it to a 5" by 6"). Amazingly easy to use!
You can remove out of the mat what you don't want or you can just delete.
This way I did not have to waste ink!
Yes, you can use tall pens with the Cameo because the lid opens up.
(here you see it drawing -- I was able to take a picture while it was moving).
And this is the card I created with my "paper"--
If you visit my blog, you might have seen my previous post where I shared a onesie card inspired by an add that had a onesie using a damask print...
Why I love my Cameo you ask?
Because of the precision in which it cuts the most intricate of designs and the ability to cut, draw, print and cut, and... and... many more!Hope you have enjoyed your visit and make sure that you visit all blogs for more Cameo inspiration and for the opportunity to win a Chomas adjustable pen holder AND a Chomas adjustable marker holder!
NEXT is Tonya
And here is the line-up in case you get lost, find a broken link, or just want to take a break and come back at a later time!
Some of the items used on my projects:


 .
.


